Jar Of Hearts. Reception D.I.Y.
Some time ago Vix, Adam and I sat around my kitchen table (it’s where all the magic happens you know..) to talk D.I.Y.
As in – innovative never-seen-before-we-invented-it-ourselves D.I.Y. Projects we can share with you gorgeous lot that are specific to these blue polka dot pages and that you can use for W-day.
This first “Jar Of Hearts” idea stemmed from my slight obsession with the Christina Perri song of the same name and… badges. I loves me a badge.
It started off as a quirky option for favours then developed into this whole way to get your guests talking during the wedding breakfast, a bespoke guest book, place card name AND favour fandango…It seems when I get a light bulb moment it becomes a full-on runaway train. Good job I’ve got Adam and his graphic skills to bring it all to life then…
And just like any D.I.Y project we will be creating in the future, we’ve got all our graphics as FREE downloads for you to help yourselves too as well as the step by step how-to.
We’ve got a few questions at the end of this post (as well as the opportunity to win cool camera stuff) so if you’ve got a minute we would really appreciate your feedback.
And as well as snapping Vix’s sexy 60′s face this week, Emma Case also took these amazing images of our Jar Of Hearts project – we even made her a badge and bought her a posh M&S sandwich as a thank-you…

Jar Of Hearts – What Is It All About Then?
…Ok so imagine you are a guest at a wedding, as you go to sit down at your table you notice your “name/place card” is part of some sort of task/game. It becomes clear that there is a “Jar of hearts” on the table (we recommend placing your jar somewhere near the table-centre) and that you have to choose yourself a badge (all instructions are on the jar label download so don’t worry about guests having to think too hard if they’ve had one or two glasses of Pinot…)
After selecting your badge and pinning it on you then have to think of some “Words of Wisdom” related to the badge label (we have love, life, lust, kissing…. a whole host of ideas for you to choose from in the available downloads) to write on your aforementioned name/place card.
A bit later on you can then pin your “words of wisdom” onto the associated canvas/pinboard (we recommend placing it by your cake/dessert/sweetie table or anywhere guests are likely to be having a nose…), not only does this provide lovely memories of W-day for the bride and groom (they can keep the canvas as is or perhaps glue the cards into a pretty book etc) but you also get to read everyone’s “words of wisdom” as the evening progresses…
Cool eh?
Now as with all things RMW it’s about doing it your way so please don’t feel you have to follow this Jar Of Hearts D.I.Y idea to the letter. For example, you may already have place cards that match the rest of your gorgeous stationery and not want to add any extra graphic/fonts to your table – there is no reason why the whole Jar Of Hearts game can’t just be on a table of its own for guests to play as and when during your reception drinks or well into the evening festivities.
And you don’t have to make a canvas – provide a pritt stick and guests can glue their cards into a lovely book of your colour scheme/choice (They always have a great selection in Paperchase)
In fact you don’t have to do the words of wisdom bit at all- just have a jar of super cute RETRO (!) badges for your nearest and dearest to help themselves to just for the craic.

What You Will Need
- Badge Maker – You can buy or hire one, or send your designs to Everybody Loves Badges.
- Badge Bits – If you are making your own.
- Heart Cutter.
- Glue – Either traditional glue, sticky strips or double sided tape.
- String – Or ribbon or cotton.
- Pen.
- Scissors or a scalpel. – you do get a neater edge with a scalpel!
- Steel Ruler.
- Paint – to paint your canvas to match your theme.
- Pins.
- Blank Canvas.
(All of these items bar the badge-maker are available for a few quid each from Hobbycraft, or any other stationery/craft store)

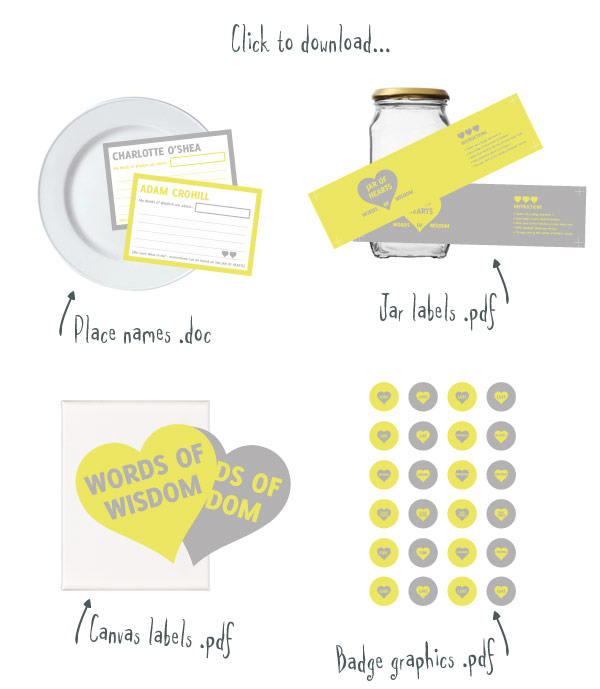
Step One – The Jar… any old one you fancy really, lid or no lid – we chose to tie the top with some parcel string that we also used for our Words of Wisdom canvas “bunting”. Ribbon, lace or floral print material would look equally as ace. You then need to cut out your jar label downloads, we recommend a scalpel for an even finish but if you’ve got a steady hand then sharp scissors will do the trick. Our downloads have cutting guides on them to help you.

Step Two – Sticking The Label On…. With regards the glue – we found the sticky strip dispensers work the best as they are accurate, non-messy and allow you to re-position a few times! But of course you could also try double-sided tape, just make sure you hold it down firmly to ensure its well and truly….stuck

Step Three – Cutting Circles…. If you are considering buying/hiring a badge maker then this is the fun part – you literally just need to get the circle cutter bit of the kit and start punching out your badges. We have a selection of words available on the downloads but that doesn’t mean you have to use all of them, you may just want to have all your badges with “Love” and “Life” on for example.

Step Four – The Actual Badge Making Bit… simple and straight forward – honestly. And if you don’t feel like making a hundred-odd of them by yourself then how about asking your best girls/boys round for tea, cake and a bit of decor creating?

Step Five – The Name Cards… again easy peasy, just download, type in the names you need, print and cut out. Again you don’t have to have a mixture of the two colour ways – if you prefer the grey border with a bit of yellow then just have those or vice versa.

Step Six – “The Words Of Wisdom” Canvas… These come in a range of sizes, a plain canvas actually looks fine – especially if you choose to decorate with a patterned ribbon/buttons/something with a bit of colour. We decided to paint ours grey to match in with the colour scheme and make the mini heart bunting “pop”. Again the bunting is optional, a length of lace or string on its own would work just as well.
The little heart cutter we used was from Hobbycraft and was about two quid, we figured not only does this “mini bunting” provide a guideline for where guests need to pin their advice but it also looks…..pretty. We simply glued the hearts to the string, after mentioning it in the last paragraph I’m sure an assortment of buttons would be super cute too…
The “Words Of Wisdom” heart-shaped canvas header label is available in downloads and just needs to be cut out and stuck on.

And Voila….here is a bicycle-T-shirt-wearing me and my example of a badge-donning “words of wisdom” writing guest. I’m guessing some of the pieces of advice might be a bit silly… but that’s what makes it fun right?


Here is where you can get hold of all of the graphics that we used in the tutorial. We have created a word document for the name card download so that you can type in your own guest names. All of the other downloads are .pdf files.
The font we used in this tutorial is called “Delicious” and you can get it for free from the brilliant font foundry exljbris.
So…what do you think? shall we do more of these types of things?
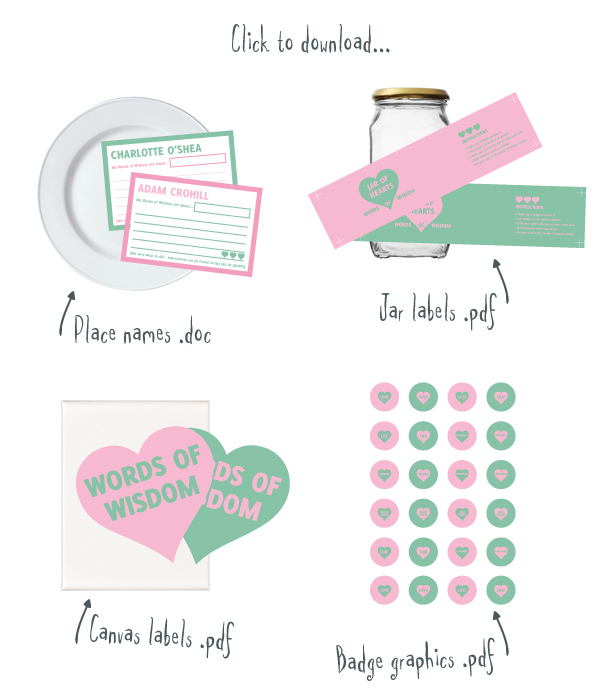
And regarding the colour options, we’ve concentrated on a yellow and grey scheme however Adam has also provided a delicious pink and green version. If you REALLY want to use Jar of Hearts for W-day but none of these shades are appropriate then drop us a comment with the hues you would like.
Providing we get enough requests we’ll create you some alternatives.
You can view different Jar Of Hearts colour downloads here.
Oh and don’t forget the Lomography goodies you can win by leaving us some love…
Big Fingers, Legs and Arms Crossed You Lot Like It Love